How to Measure Your Head for a Hat
Quick Answer
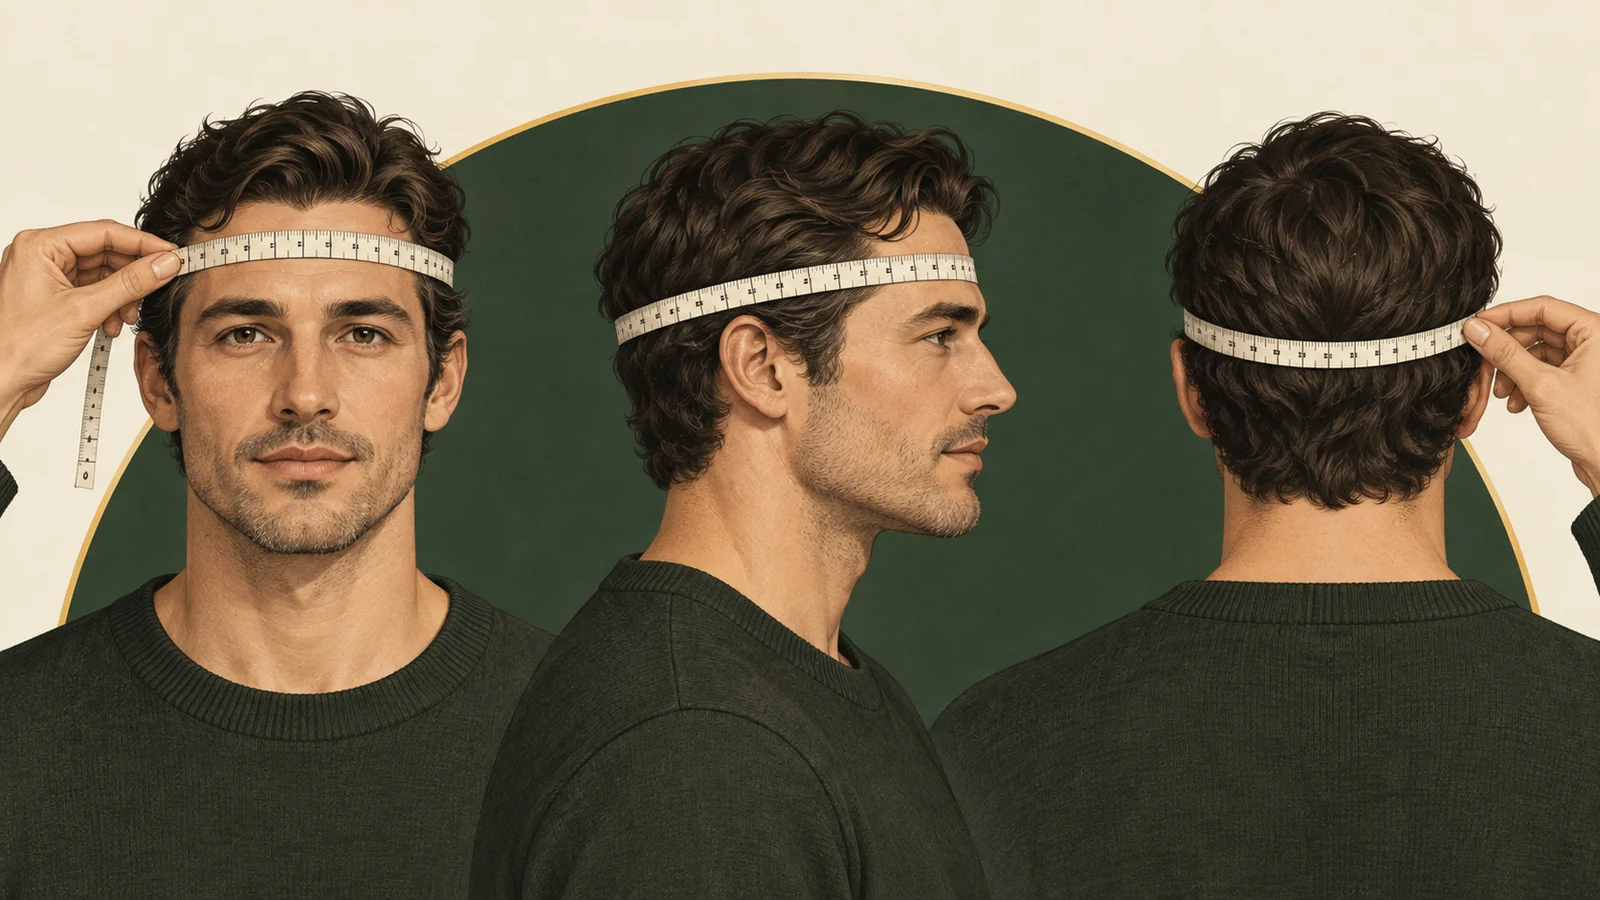
Wrap a flexible measuring tape around your head where the hat’s sweatband will actually sit. For most hats, that means across the forehead, just above the ears, and around the most prominent part of the back of your head.
Keep the tape flat and comfortably snug. It should touch your head all the way around without squeezing your skin or compressing your hair.
Write down the measurement in centimeters, then remove the tape and measure again from scratch. If you get two similar readings that point you to the same size, your measurement is repeatable enough to use.
From there, compare your result with the current size chart for the hat or brand you are considering.
What You Need
A flexible dressmaker’s measuring tape is the easiest option.
If you do not have one, use a piece of non-stretch string or a narrow strip of paper. Wrap it around your head, mark where the ends meet, then lay it flat and measure the length with a ruler.
Avoid elastic cord or anything else that stretches, as it can give you an inaccurate result.
A mirror can also help you check that the tape is sitting correctly around the sides and back of your head. If someone is available to help, even better.
How to Measure Your Head for a Hat
1. Decide How the Hat Will Sit
Before measuring, think about where you actually plan to wear the hat.
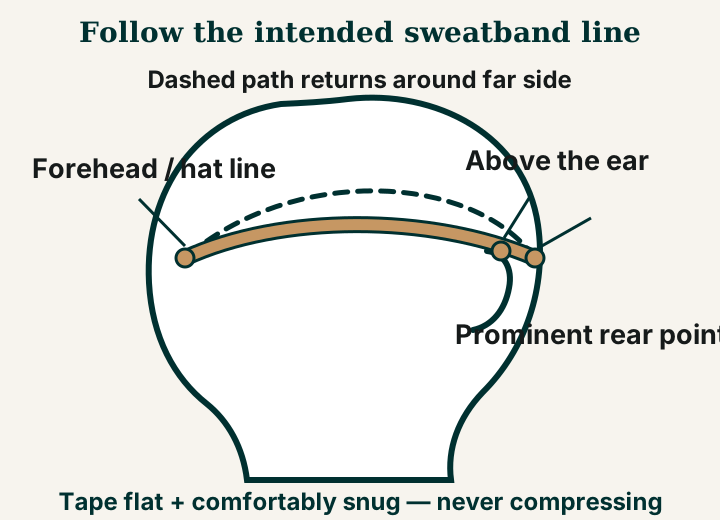
The measurement should follow the same line as the hat’s sweatband.
For most hats, this line crosses the forehead, passes above the ears, and continues around the most prominent part of the back of the head.
If you normally wear a particular style tilted, lower at the back, or in another deliberate position, measure along that line instead. A perfectly level measurement isn’t much use if that’s not where your hat will actually sit.
Manufacturer instructions are not always identical. For example, Stetson describes measuring around the middle of the forehead and roughly 1/8 inch above the ear, while Brixton recommends approximately one inch above the brow, a finger width above the ear, and across the prominent point at the back of the head.
That is why the most useful general rule is simple:
Measure where the sweatband will actually sit.
The exact height may vary slightly depending on the hat, how you wear it, and the manufacturer’s instructions.
2. Position the Tape
Place the start of the measuring tape at the front of your head, where the sweatband will sit.
Guide it around your head, passing above both ears and around the most prominent part at the back, until the tape meets the starting point.
If possible, check the position in a mirror.
Make sure the tape is not:
- crossing over an ear;
- climbing toward the crown;
- dipping too low at the back; or
- twisting onto its edge.
You want one smooth, continuous line around the head.
3. Keep the Tape Comfortably Snug
The tape should stay in contact with your head without sagging or sliding.
At the same time, do not pull it tight enough to squeeze your skin or flatten your hair.
Think of “comfortably snug” as secure contact without compression.
Pull too tightly and the measurement will be artificially small. Leave a gap and it will be too large.
4. Record the Measurement in Centimeters
Read the circumference where the tape meets its starting point and write it down.
Centimeters are usually the most useful primary measurement. If your tape shows decimals, keep them rather than rounding immediately. For example, write down 58.4 cm rather than automatically changing it to 58 or 59 cm.
You can also record the measurement in inches if the brand you are shopping from uses them.
A precise measurement does not mean a hat will fit with millimeter-level precision. Hat sizing, construction, materials, head shape, and personal fit preference all affect the final result.
Think of your circumference as a reliable starting point, not a guarantee of perfect fit.
5. Measure Again
Do not simply look at the same tape placement twice.
Remove the tape completely, reset it, and take the measurement again from the beginning.
This helps you check whether you can reproduce both the tape position and the tension.
Ideally, you want two readings that are close enough to point you to the same size.
If they do not, check your technique before choosing a size.
What if Your Measurements Are Different?
Small differences usually mean the tape position or tension changed between measurements.
Remove the tape and try again, checking:
- Is it following the same sweatband line?
- Is it above both ears?
- Is it passing around the same point at the back of your head?
- Is the tape flat and untwisted?
- Are you using roughly the same tension each time?
- Is your hair arranged the same way?
Repeat the process until you get two measurements that point you to the same size.
Do not automatically average inconsistent results, and do not simply choose the larger number unless the manufacturer specifically tells you to.
If the readings still vary significantly, try again later or ask someone to help position the tape.
Some brands use their own rules. New Era, for example, advises its customers to measure twice and use the larger measurement.
That is a New Era-specific sizing instruction, not a universal rule for measuring hats.
Hair, Braids, Wigs and Liners
Measure your head with the hairstyle or additional layer you expect to wear under the hat.
Thick braids, wigs, headscarves, liners, and similar layers can all change the amount of space you need.
The goal is not to get the smallest possible measurement. The goal is to measure the way you will actually wear the hat.
If you regularly switch between very different hairstyles or setups, take a separate measurement for each and label them clearly—for example:
Hair flat: 57.8 cm
With braids: 59.1 cm
That gives you much more useful information when choosing a hat.
Does the Measuring Method Change for Different Hat Types?
The basic principle stays the same: measure along the line where the sweatband will sit.
What changes is how much adjustment the hat allows, how deeply it sits, and how closely your measurement needs to match the manufacturer’s sizing system.
Fitted Caps
Fitted caps do not have an adjustable closure, so getting the size right matters more.
Measure carefully and compare your result with the current size chart for the exact brand and style you are buying.
A generic fitted-cap conversion chart is useful as a reference, but it should not replace the manufacturer’s own chart.
Adjustable and Stretch Caps
Adjustable and stretch-fit caps cover a range of head sizes, which gives you more flexibility.
Even so, “adjustable” does not mean unlimited.
Your head measurement helps you check whether you fall comfortably within the stated range or are close to one of its limits.
Fedoras, Western Hats and Other Brimmed Hats
Use the same sweatband-line method.
Then check the current instructions for the specific manufacturer, especially when its sizing system, construction, materials, or supplied fit adjustments affect the size decision.
Flat Caps, Bakerboy Caps and Deliberately Tilted Styles
If a particular cap is designed to sit deeper—or you deliberately wear it at an angle—measure for that wearing position rather than forcing the tape into a standard horizontal line.
Lock & Co., for example, recommends a deeper measuring position for its bakerboy caps.
Helmets Are Different
This guide applies to ordinary fashion hats.
Safety helmets and other protective headwear have their own fitting procedures and safety requirements. Always follow the manufacturer’s instructions for those products rather than using general hat-sizing advice.
What to Do if You Are Between Sizes
Start with the current size chart for the exact brand and model you are considering.
Some manufacturers recommend choosing the larger size when your measurement falls between two available sizes. Akubra is one example.
However, that is not a universal rule.
Also consider any adjustment options built into the hat, such as:
- an adjustable closure;
- a documented stretch-fit range; or
- removable sizing inserts.
Without information about the specific model, your head circumference can narrow down the likely size, but it cannot completely remove uncertainty.
What Head Circumference Can—and Cannot—Tell You
It Can Give You a Useful Size Starting Point
A repeatable head circumference gives you a reliable measurement to compare against manufacturer size charts, standard size conversions, and adjustable-fit ranges.
It is the most useful first step in choosing a hat size. Once you have your measurement, use our Hat Size Guide to convert it into the sizing system you need.
It Cannot Tell You Your Head Shape or Guarantee the Fit
Two people can have exactly the same head circumference and still experience the same hat very differently.
One head may be longer from front to back, while another is wider from side to side. As a result, a hat with the “correct” circumference might still pinch at the sides, feel loose at the front and back, or sit awkwardly because of its crown shape or depth.
Circumference tells you how large your head is around the sweatband line.
It does not tell you everything about its shape.
That means a generic size conversion cannot guarantee that a particular hat model will fit perfectly.
If we don’t have enough evidence about how a particular model fits different head shapes, we’ll call the fit unknown rather than pretend we know.
If fit still feels wrong despite the circumference being right, our Head Shapes for Hats guide explains why.
Common Head-Measuring Mistakes
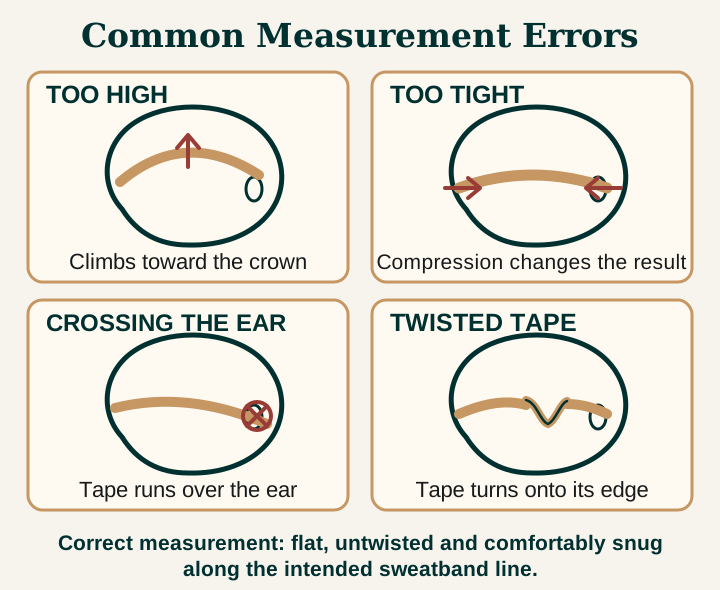
Before using your measurement, make sure you have not:
- measured around the crown instead of the sweatband line;
- relied on one fixed eyebrow or ear height regardless of the hat’s intended position;
- allowed the tape to climb or dip at the back;
- crossed over an ear;
- twisted the measuring tape;
- pulled the tape tightly enough to compress your skin or hair;
- left slack between the tape and your head;
- used stretchy string or elastic;
- measured only once;
- changed your hairstyle between measurements;
- rounded the measurement before recording the original value;
- treated a generic conversion chart or an old hat label as a substitute for the current manufacturer chart; or
- assumed that circumference alone reveals your head shape or guarantees that a particular hat will fit.
Next Step: Build Your NESH FIT Profile
Once you have a repeatable head circumference, use the Hat Size Guide to see the approximate size equivalents.
You can then enter your measurement into the NESH Hat Size + Head Shape Profiler to convert your measurement between centimeters and inches and, if you want, add your own head-shape observation.
Your head circumference is the starting point for finding the right hat—not the entire fit answer.
For the complete sizing and fit system, visit the FIT hub.